- 28
- 08月
This is the ninth article in the series in which I document my experience writing web applications in Python using the Flask microframework.
The goal of the tutorial series is to develop a decently featured microblogging application that demonstrating total lack of originality I have decided to call microblog.
Here is an index of all the articles in the series that have been published to date:
- Part I: Hello, World!
- Part II: Templates
- Part III: Web Forms
- Part IV: Database
- Part V: User Logins
- Part VI: Profile Page And Avatars
- Part VII: Unit Testing
- Part VIII: Followers, Contacts And Friends
- Part IX: Pagination (this article)
- Part X: Full Text Search
- Part XI: Email Support
- Part XII: Facelift
- Part XIII: Dates and Times
- Part XIV: I18n and L10n
- Part XV: Ajax
- Part XVI: Debugging, Testing and Profiling
Table of Contents:
[TOC]
Recap
In the previous article in the series we've made all the database changes necessary to support the 'follower' paradigm, where users choose other users to follow.
Today we will build on what we did last time and enable our application to accept and deliver real content to its users. We are saying goodbye to the last of our fake objects today!
Submission of blog posts
Let's start with something simple. The home page should have a form for users to submit new posts.
First we define a single field form object (file app/forms.py):
class PostForm(Form):
    post = TextField('post', validators = [Required()])
Next, we add the form to the template (file app/templates/index.html):
<!-- extend base layout -->
{% extends "base.html" %}

{% block content %}
<h1>Hi, {{g.user.nickname}}!</h1>
<form action="" method="post" name="post">
    {{form.hidden_tag()}}
    <table>
        <tr>
            <td>Say something:</td>
            <td>{{ form.post(size = 30, maxlength = 140) }}</td>
            <td>
            {% for error in form.errors.post %}
            <span style="color: red;">[{{error}}]</span><br>
            {% endfor %}
            </td>
        </tr>
        <tr>
            <td></td>
            <td><input type="submit" value="Post!"></td>
            <td></td>
        </tr>
    </table>
</form>
{% for post in posts %}
<p>
  {{post.author.nickname}} says: <b>{{post.body}}</b>
</p>
{% endfor %}
{% endblock %}
Nothing earth shattering so far, as you can see. We are simply adding yet another form, like the ones we've done before.
Last of all, the view function that ties everything together is expanded to handle the form (file app/views.py):
from forms import LoginForm, EditForm, PostForm
from models import User, ROLE_USER, ROLE_ADMIN, Post

@app.route('/', methods = ['GET', 'POST'])
@app.route('/index', methods = ['GET', 'POST'])
@login_required
def index():
    form = PostForm()
    if form.validate_on_submit():
        post = Post(body = form.post.data, timestamp = datetime.utcnow(), author = g.user)
        db.session.add(post)
        db.session.commit()
        flash('Your post is now live!')
        return redirect(url_for('index'))
    posts = [
        {
            'author': { 'nickname': 'John' },
            'body': 'Beautiful day in Portland!'
        },
        {
            'author': { 'nickname': 'Susan' },
            'body': 'The Avengers movie was so cool!'
        }
    ]
    return render_template('index.html',
        title = 'Home',
        form = form,
        posts = posts)
Let's review the changes in this function one by one:
- We are now importing the
PostandPostFormclasses - We accept POST requests in both routes associated with the
indexview function, since that is how we will receive submitted posts. - When we arrive at this view function through a form submission we insert a new
Postrecord into the database. When we arrive at it via a regular GET request we do as before. - The template now receives an additional argument, the
form, so that it can render the text field.
One final comment before we continue. Notice how after we insert a new Post into the detabase we do this:
return redirect(url_for('index'))
We could have easily skipped the redirect and allowed the function to continue down into the template rendering part, and it would have been more efficient. Because really, all the redirect does is return to this same view function to do that, after an extra trip to the client web browser.
So, why the redirect? Consider what happens after the user writes a blog post, submits it and then hits the browser's refresh key. What will the refresh command do? Browsers resend the last issued request as a result of a refresh command.
Without the redirect, the last request is the POST request that submitted the form, so a refresh action will resubmit the form, causing a second Post record that is identical to the first to be written to the database. Not good.
By having the redirect, we force the browser to issue another request after the form submission, the one that grabs the redirected page. This is a simple GET request, so a refresh action will now repeat the GET request instead of submitting the form again.
This simple trick avoids inserting duplicate posts when a user inadvertently refreshes the page after submitting a blog post.
Displaying blog posts
And now we get to the fun part. We are going to grab blog posts from the database and display them.
If you recall from a few articles ago, we created a couple of fake posts and we've been displaying those in our home page for a long time. The fake objects were created explicitly in the index view function as a simply Python list:
    posts = [
        {
            'author': { 'nickname': 'John' },
            'body': 'Beautiful day in Portland!'
        },
        {
            'author': { 'nickname': 'Susan' },
            'body': 'The Avengers movie was so cool!'
        }
    ]
But in the last article we created the query that allows us to get all the posts from followed users, so now we can simply replace the above with this (file app/views.py):
posts = g.user.followed_posts().all()
And when you run the application you will be seeing blog posts from the database!
The followed_posts method of the User class returns a sqlalchemy query object that is configured to grab the posts we are interested in. Calling all() on this query just retrieves all the posts into a list, so we end up with a structure that is very much alike the fake one we've been using until now. It's so close that the template does not even notice.
At this point feel free to play with the application. You can create a few users, make them follow others, and finally post some messages to see how each user sees its blog post stream.
Pagination
The application is looking better than ever, but we have a problem. We are showing all of the followed posts in the home page. What happens if a user has a thousand followed posts? Or a million? As you can imagine, grabbing and handling such a large list of objects will be extremely inefficient.
Instead, we are going to show this potentially large number of posts in groups, or pages.
Flask-SQLAlchemy comes with very good support for pagination. If for example, we wanted to get the first three followed posts of some user we can do this:
posts = g.user.followed_posts().paginate(1, 3, False).items
The paginate method can be called on any query object. It takes three arguments:
- the page number, starting from 1,
- the number of items per page,
- an error flag. If True, when an out of range page is requested a 404 error will be automatically returned to the client web browser. If False, an empty list will be returned instead of an error.
The return value from paginate is a Pagination object. The items member of this object contains the list of items in the requested page. There are other useful things in the Pagination object that we will see a bit later.
Now let's think about how we can implement pagination in our index view function. We can start by adding a configuration item to our application that determines how many items per page we will display (file config.py):
# pagination
POSTS_PER_PAGE = 3
It is a good idea to have these global knobs that can change the behavior of our application in the configuration file all together, because then we can go to a single place to revise them all.
In the final application we will of course use a much larger number than 3, but for testing it is useful to work with small numbers.
Next, let's decide how the URLs that request different pages will look. We've seen before that Flask routes can take arguments, so we can add a suffix to the URL that indicates the desired page:
http://localhost:5000/         <-- page #1 (default)
http://localhost:5000/index    <-- page #1 (default)
http://localhost:5000/index/1  <-- page #1
http://localhost:5000/index/2  <-- page #2
This format of URLs can be easily implemented with an additional route added to our view function (file app/views.py):
from config import POSTS_PER_PAGE

@app.route('/', methods = ['GET', 'POST'])
@app.route('/index', methods = ['GET', 'POST'])
@app.route('/index/<int:page>', methods = ['GET', 'POST'])
@login_required
def index(page = 1):
    form = PostForm()
    if form.validate_on_submit():
        post = Post(body = form.post.data, timestamp = datetime.utcnow(), author = g.user)
        db.session.add(post)
        db.session.commit()
        flash('Your post is now live!')
        return redirect(url_for('index'))
    posts = g.user.followed_posts().paginate(page, POSTS_PER_PAGE, False).items
    return render_template('index.html',
        title = 'Home',
        form = form,
        posts = posts)
Our new route takes the page argument, and declares it as an integer. We also need to add the page argument to the index function, and we have to give it a default value because two of the three routes do not have this argument, so for those the default will always be used.
And now that we have a page number available to us we can easily hook it up to our followed_posts query, along with the POSTS_PER_PAGE configuration constant we defined earlier.
Note how easy these changes are, and how little code is affected each time we make a change. We are trying to write each part of the application without making any assumptions regarding how the other parts work, and this enables us to write modular and robust applications that are easier to test and are less likely to fail or have bugs.
At this point you can try the pagination by entering URLs for the different pages by hand into your browser's address bar. Make sure you have more than three posts available so that you can see more than one page.
Page navigation
We now need to add links that allow users to navigate to the next and/or previous pages, and luckily this is extremely easy to do, Flask-SQLAlchemy does most of the work for us.
We are going to start by making a small change in the view function. In our current version we use the paginate method as follows:
posts = g.user.followed_posts().paginate(page, POSTS_PER_PAGE, False).items
By doing this we are only keeping the items member of the Pagination object returned by paginate. But this object has a number of other very useful things in it, so we will instead keep the whole object (file app/views.py):
posts = g.user.followed_posts().paginate(page, POSTS_PER_PAGE, False)
To compensate for this change, we have to modify the template (file app/templates/index.html):
<!-- posts is a Paginate object -->
{% for post in posts.items %}
<p>
  {{post.author.nickname}} says: <b>{{post.body}}</b>
</p>
{% endfor %}
What this change does is make the full Paginate object available to our template. The members of this object that we will use are:
has_next: True if there is at least one more page after the current onehas_prev: True if there is at least one more page before the current onenext_num: page number for the next pageprev_num: page number for the previous page
With these for elements we can produce the following (file app/templates/index.html):
<!-- posts is a Paginate object -->
{% for post in posts.items %}
<p>
  {{post.author.nickname}} says: <b>{{post.body}}</b>
</p>
{% endfor %}
{% if posts.has_prev %}<a href="{{ url_for('index', page = posts.prev_num) }}"><< Newer posts</a>{% else %}<< Newer posts{% endif %} |
{% if posts.has_next %}<a href="{{ url_for('index', page = posts.next_num) }}">Older posts >></a>{% else %}Older posts >>{% endif %}
So we have two links. First we have one labeled "Newer posts" that sends us to the previous page (keep in mind we show posts sorted by newest first, so the first page is the one with the newest stuff). Conversely, the "Older posts" points to the next page.
When we are looking at the first page we do not want to show a link to go to the previous page, since there isn't one. This is easy to detect because posts.has_prev will be False. We handle that case simply by showing the same text of the link but without the link itself. The link to the next page is handled in the same way.
Implementing the Post sub-template
Back in the article where we added avatar pictures we defined a sub-template with the HTML rendering of a single post. The reason we created this sub-template was so that we can render posts with a consistent look in multiple pages, without having to duplicate the HTML code.
It is now time to implement this sub-template in our index page. And, as most of the things we are doing today, it is surprisingly simple (file app/templates/index.html):
<!-- posts is a Paginate object -->
{% for post in posts.items %}
    {% include 'post.html' %}
{% endfor %}
Amazing, huh? We just discarded our old rendering code and replaced it with an include of the sub-template. Just with this, we get the nicer version of the post that includes the user's avatar.
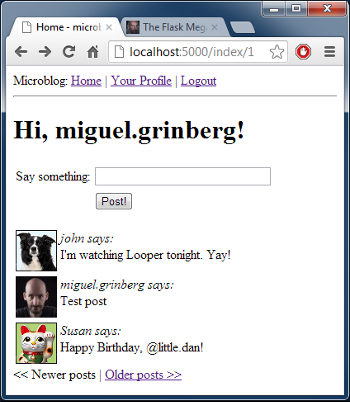
Here is a screenshot of the index page of our application in its current state:
The user profile page
We are done with the index page for now. However, we have also included posts in the user profile page, not posts from everyone but just from the owner of the profile. To be consistent the user profile page should be changed to match the index page.
The changes are similar to those we made on the index page. Here is a summary of what we need to do:
- add an additional route that takes the page number
- add a
pageargument to the view function, with a default of 1 - replace the list of fake posts with the proper database query and pagination
- update the template to use the pagination object
Here is the updated view function (file app/views.py):
@app.route('/user/<nickname>')
@app.route('/user/<nickname>/<int:page>')
@login_required
def user(nickname, page = 1):
    user = User.query.filter_by(nickname = nickname).first()
    if user == None:
        flash('User ' + nickname + ' not found.')
        return redirect(url_for('index'))
    posts = user.posts.paginate(page, POSTS_PER_PAGE, False)
    return render_template('user.html',
        user = user,
        posts = posts)
Note that this function already had an argument (the nickname of the user), so we add the page number as a second argument.
The changes to the template are also pretty simple (file app/templates/user.html):
<!-- posts is a Paginate object -->
{% for post in posts.items %}
    {% include 'post.html' %}
{% endfor %}
{% if posts.has_prev %}<a href="{{ url_for('user', nickname = user.nickname, page = posts.prev_num) }}"><< Newer posts</a>{% else %}<< Newer posts{% endif %} |
{% if posts.has_next %}<a href="{{ url_for('user', nickname = user.nickname, page = posts.next_num) }}">Older posts >></a>{% else %}Older posts >>{% endif %}
Final words
Below I'm making available the updated version of the microblog application with all the pagination changes introduced in this article.
Download microblog-0.9.zip.
As always, a database isn't provided so you have to create your own. If you are following this series of articles you know how to do it. If not, then go back to the database article to find out.
As always, I thank you for following my tutorial. I hope to see you again in the next one!
Miguel
Origin: http://blog.miguelgrinberg.com/post/the-flask-mega-tutorial-part-ix-pagination